A cracked fishing rod can ruin your day on the water. When you notice a crack forming near the tip of your rod blank, you might think it’s time to buy a replacement. However, many anglers successfully repair these cracks and extend the life of their favorite rods. The experts at Crazy Fishing Gear understand that a quality rod represents a significant investment worth protecting. Therefore, learning proper repair techniques can save you money while keeping your trusted equipment in service.
Rod blanks crack for various reasons. Most commonly, the damage occurs from impact against hard surfaces like boat gunwales or dock posts. Additionally, stress from fighting large fish can create hairline fractures that worsen over time. The area near the tip is particularly vulnerable because it’s the thinnest part of the blank. When you spot a crack, addressing it quickly prevents further damage. Many anglers find that proper fishing rod tip repair techniques can restore their rod’s performance to near-original condition.
Assessing the Damage
Before starting any repair, you need to examine the crack carefully. Look at the crack’s length, depth, and location. Small surface cracks require different treatment than deep fractures that penetrate through the blank wall. Hold the rod up to a light source to see how far the damage extends. Additionally, flex the rod gently to check if the crack opens wider under stress.
The severity of the crack determines whether repair is worthwhile. Cracks shorter than half an inch often respond well to simple fixes. However, longer cracks or those that completely circle the blank may compromise the rod’s structural integrity beyond repair. In such cases, cutting the rod down and installing a new tip section might be your best option.
Gathering Your Repair Materials
Successful repairs require the right supplies. You’ll need several key items to complete the job properly. First, obtain high-quality rod wrapping thread in a color that matches your rod. Most tackle shops carry thread specifically designed for rod building. Next, purchase flexible epoxy or rod finish coating to seal your repair.
Furthermore, you’ll need denatured alcohol for cleaning, fine-grit sandpaper, and sharp scissors or a razor blade. A rod wrapping tool or simple book can hold your thread spool. Some anglers also use fiberglass cloth or carbon fiber tape for reinforcing larger cracks. These materials provide additional strength to compromised areas.
Preparing the Cracked Area
Proper preparation ensures your repair holds up under fishing pressure. Start by cleaning the damaged section thoroughly with denatured alcohol. This removes oils, dirt, and any wax coatings that could prevent adhesive bonding. Let the area dry completely before proceeding.
Next, use fine-grit sandpaper to lightly roughen the surface around the crack. This creates better adhesion for the epoxy and thread wraps. Be gentle during this step to avoid enlarging the crack or creating additional damage. Wipe away any dust with a clean cloth dampened with alcohol.
Applying the Initial Epoxy Layer
The first epoxy application fills the crack and begins the bonding process. Mix your two-part epoxy according to the manufacturer’s instructions. Work it into the crack using a toothpick or small applicator. Make sure the epoxy penetrates deeply into the fracture. According to Field & Stream, proper epoxy application is crucial for creating a durable bond in fishing equipment repairs.
Allow this initial layer to cure partially until it becomes tacky but not fully hardened. This typically takes 30 minutes to an hour depending on temperature and humidity. The tacky surface provides an ideal base for thread wrapping. Don’t rush this step, as proper curing prevents the thread from sliding during application.
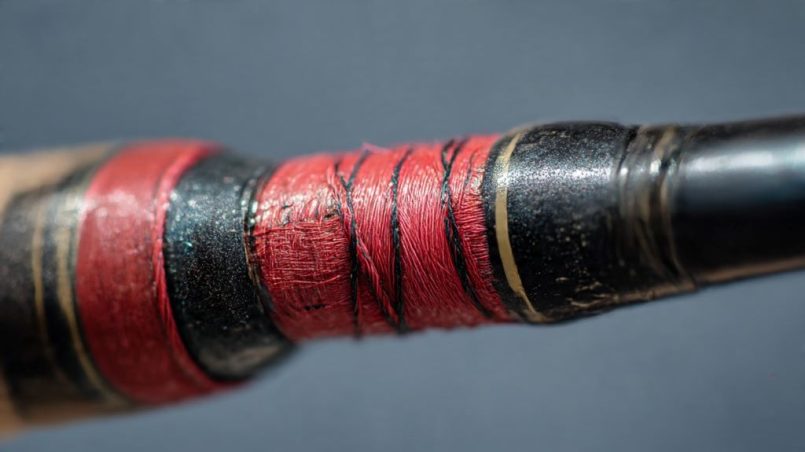
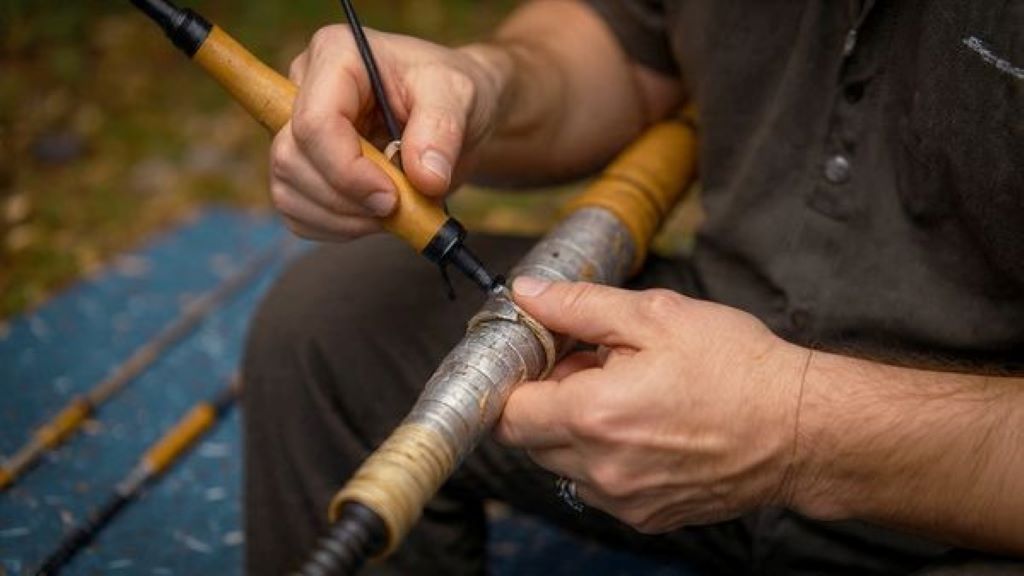
Wrapping the Damaged Section
Thread wrapping provides the main structural reinforcement for your repair. Start wrapping about half an inch below the crack. Hold the thread at a slight angle and rotate the rod while maintaining steady tension. Each wrap should sit snugly against the previous one without gaps or overlaps.
Continue wrapping past the crack’s upper end by at least half an inch. This distributes stress across a wider area and prevents the crack from extending. Maintain consistent tension throughout the wrapping process. Too loose, and the wrap won’t provide adequate support. Too tight, and you risk breaking the thread or damaging the blank further.
Finishing the Thread Wrap
Once you’ve covered the damaged area completely, you need to secure the thread end. Create a loop with a separate piece of thread and lay it along the rod. Wrap over this loop several times, then cut your working thread and insert the end through the loop. Pull the loop back under the wraps to bury the thread end. Trim any excess carefully with a razor blade.
Applying the Protective Coating
The final coating seals your repair and protects the thread from moisture and UV damage. Apply rod finish or flexible epoxy over the entire wrapped section. Use a small brush or your finger to spread it evenly. Rotate the rod slowly while the coating cures to prevent drips and ensure even coverage.
Most coatings require 24 hours to cure fully. Some anglers apply multiple thin coats rather than one thick layer. This approach reduces the risk of runs and produces a smoother finish. Sand lightly between coats with very fine sandpaper for best adhesion.
Advanced Repair Techniques
For more severe cracks, additional reinforcement may be necessary. Some experienced rod builders use fiberglass cloth wraps under the thread. Cut a small piece of cloth and wrap it around the blank, securing it with epoxy before adding thread wraps. This method works well for deeper cracks or compromised sections.
Carbon fiber tape offers another option for serious damage. This material provides exceptional strength with minimal added weight. Wrap it around the damaged area, then cover it with thread for a finished appearance. These advanced techniques require more skill but deliver professional-grade results.
Testing Your Repair
After the coating cures completely, test your repair before returning to the water. Flex the rod gently to ensure the repaired section doesn’t crack or separate. The repair should feel solid without any soft spots or clicking sounds. Additionally, check that the rod’s action hasn’t changed significantly.
Start with light fishing to verify the repair holds under actual conditions. Monitor the repaired area closely during your first few trips. If you notice any problems, address them immediately before further damage occurs. Most properly executed repairs last for years of regular fishing.
Preventing Future Damage
Prevention is always easier than repair. Store your rods in protective cases or tubes when transporting them. Avoid leaning them against hard surfaces where they might fall. When fighting fish, use proper techniques that distribute stress evenly along the blank.
Inspect your rods regularly for signs of developing cracks or wear. Catching problems early makes repairs simpler and more successful. Clean your rods after each fishing trip to remove salt, dirt, and debris that can degrade the blank material over time.
When Professional Repair Makes Sense
Some situations call for professional help. If you lack confidence in your repair skills, local rod builders can handle the job. They have specialized tools and extensive experience with various blank materials. Professional repairs typically cost less than replacing an entire rod.
Furthermore, high-end rods with complex actions deserve expert attention. A poorly executed repair can alter the rod’s performance characteristics. Professionals understand how different materials and construction methods affect repairs. They can often restore expensive rods to like-new condition.
Conclusion
Fixing a cracked fishing rod blank near the tip is an achievable project for most anglers. With proper materials, careful preparation, and attention to detail, you can extend your rod’s life significantly. The process involves cleaning the damaged area, applying epoxy, wrapping with thread, and adding a protective coating. While some cracks require professional attention, many repairs succeed with basic tools and patience. Regular inspection and proper storage help prevent future damage. By mastering these repair techniques, you’ll save money and keep your favorite rods fishing strong for years to come.
Frequently Asked Questions
Can I fish with a cracked rod before repairing it?
Fishing with a cracked rod risks worsening the damage and potentially losing your catch. The crack will likely spread under the stress of casting and fighting fish. Small surface cracks might hold temporarily, but it’s better to repair the damage before your next trip. A sudden failure during battle with a trophy fish could result in both losing the fish and ruining your rod beyond repair.
How long does a rod blank repair typically last?
A properly executed repair can last for many years, sometimes for the rod’s entire remaining life. The longevity depends on the crack’s severity, repair quality, and how you use the rod afterward. Many anglers report successful repairs lasting five years or more with regular use. However, repaired sections may never regain 100% of their original strength, so using appropriate tackle and avoiding unnecessary stress helps maximize the repair’s lifespan.
What’s the difference between rod finish and regular epoxy?
Rod finish is specially formulated to remain flexible after curing, which is crucial for fishing rods that bend under load. Regular epoxy becomes brittle and can crack when the rod flexes. Rod finish also resists yellowing from UV exposure and provides a smoother, more professional appearance. While regular epoxy works in a pinch for emergency repairs, rod finish delivers superior long-term results and better protects your investment.
Should I repair a crack near the ferrule?
Cracks near ferrules are more challenging because this area experiences high stress when the rod is assembled and flexed. Small cracks may be repairable using the same techniques described above, but larger damage often requires cutting the section down and installing a new ferrule. If the crack is within an inch of the ferrule, consider consulting a professional rod builder who can assess whether repair is viable or if replacement is the safer option.
Can graphite and fiberglass rods be repaired the same way?
The basic repair process works for both materials, though fiberglass is generally more forgiving. Graphite rods are stiffer and more brittle, making them prone to catastrophic failure if repairs aren’t done correctly. Fiberglass has more flexibility and tends to crack less severely. However, both materials respond well to epoxy and thread wrapping when properly prepared. The key difference is that graphite requires extra care during preparation and coating to avoid creating stress points that could cause new cracks.
Related Topics:
